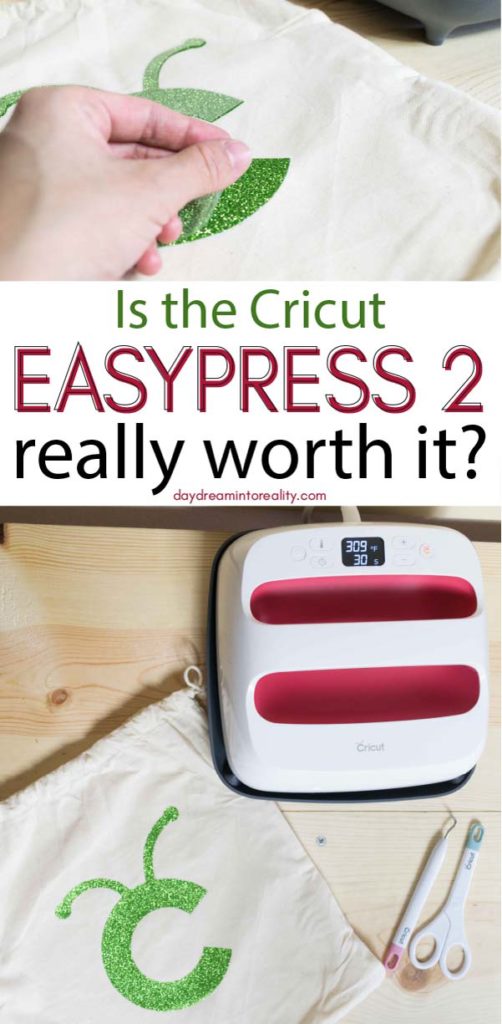
Cricut Easy Press 2 Reviews Everthing Bundle
Hi Daydreamers!
Today you will learn whether the "EasyPress 2" is the right fit for you or not! This guide will walk you through all you need to know to make the perfect decision.
Before we get into deep – and hot 😛 – waters reviewing the EasyPress 2, I just want to tell you a little bit of what's coming up in the next couple of weeks.
I hope you are all having a great year! I just came back from a little vacation with family and well, I am all energized to get back on writing great content for you all.
Lately, I have been focusing on Cricut Design Space tutorials. If you haven't mastered Cricut's software you should definitely check them out. I have a full tutorial for desktop and another one for iPad and iPhone.
I have invested in a couple of things, not only because they are really cool and I really need them for my line of work, but also because I want you guys to have the best tutorials and resources on the whole Internet.
So…
Get ready to see tons of Maker stuff!
Yas Yas Yas!
Note: I am an avid crafter and I love creating new things, I am not in the T-Shirt business, but I have created multiple projects with Iron-ON and I noticed a huge difference between the EasyPress 2 and a normal Iron!
What is a Cricut EasyPress?
If you are just getting started with the Cricut you might not even know what an EasyPress is.
An EasyPress is a device that allows you to transfer your Iron-On or HTV (Heat Transfer Vinyl) designs to your desired surface.
Iron-On is a type of material that needs to be heated in order to be transferred successfully. And it's used to customize T-shirts, wood, metal and even paper!
The way you apply heat to your Iron-On or HTV is extremely important, because if you don't do it the right way; not only you will be frustrated, but you will also risk ruining your materials.
Not Fun, Right?
You see, every type of Iron-On vinyl and the surface you want to apply it requires different temperatures and an ideal time for proper transfer. The EasyPress allows you to control all those variables.
Therefore all of your second-guessing and doubts will be forever out of the picture, because no matter what; if you follow instructions, at the end you will have a beautiful custom T-Shirt, and or surface.
So… with The EasyPress you can heat up and transfer your vinyl beautifully, every single time!
EasyPress vs EasyPress 2
So far Cricut has released 2 versions of the EasyPress.
Look at the comparison table down below and let's chat a little bit more about the EasyPress 2 features.
| Features | EasyPress | EasyPress 2 |
| Size | 9 x 9 in | 6 x 7 Inches 9 x 9 Inches 12 x 10 Inches |
| Color | Turquoise | Raspberry |
| Max Temp. | 350 °F | 400 °F |
| Variance | +/- 9°F | +/- 5°F |
| USB Port | No | Yes |
| Heat Plate | Thinner | Thicker |
| Heat Up Time | Fast | 25% Faster |
| Remember last temperature | No | Yes |
| Sublimation | No | Yes |
If you already have an EasyPress and feel you are left out because of the New one. Don't feel like that, if you are using regular Iron-ON or HTV I really think you'll be just fine 🙂
- Check Prices for the EasyPress on Amazon (It's no longer available on Cricut's website)
- Check Prices for the EasyPress 2 on Cricut's Website
- Check Prices for the EasyPress 2 on Amazon
EasyPress 2 Anatomy and Features
Let's see more in-depth about the EasyPress 2 capabilities and functions.
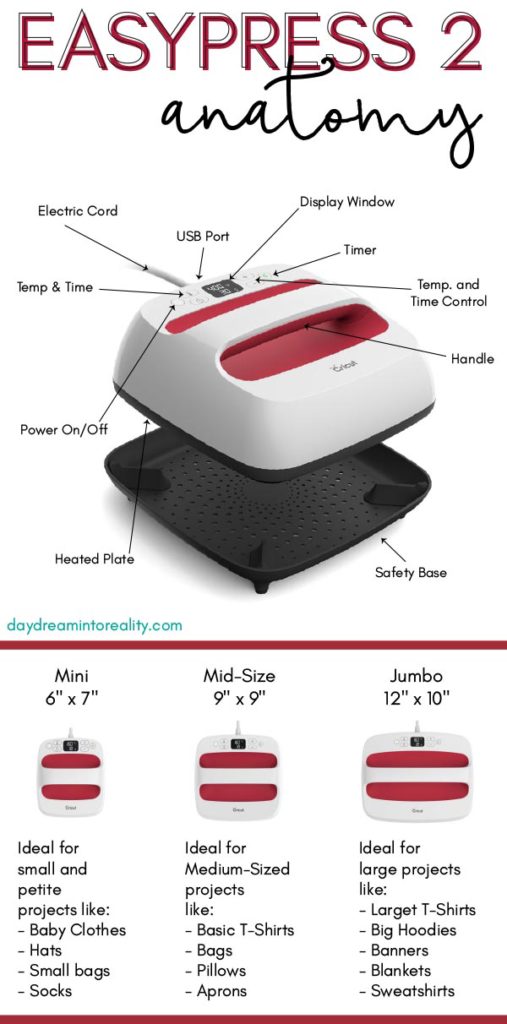
Size & Color
The new EasyPress 2 comes in a raspberry color and 3 different sizes that allow you to have more control with different sizes of the material you will be working with.
- Mini: the newest release. It's not in the graphic. But I have a complete review of the Easypress Mini with a lot of pictures and tutorials.
- this is the perfect size for petite or small projects. It's perfect for traveling and ideal for baby clothing, bibs, cosmetics bags, and other small surfaces.
- 9 x 9 Inches: This size is perfect for medium projects. T-shirts, Wood and Metal surfaces, etc.
- 12 x 10 Inches: This is the Jumbo size and it's ideal for those big projects such as large T-Shirts, Hoodies, and large projects.
I picked the 9 x 9 inches one; I live in a teeny tiny apartment and every inch of space I take needs to be considered very wisely.
I also think that the price of the middle one was the most reasonable when comparing it with the mini and jumbo one.
Some people will buy the 3 of them, and I just can't imaging needing the three of them right now. The size you get should be the one you think you will be using more.
Do you work with petite size projects, or do you work with Jumbo size?
For me, I am like Goldilocks, not too big or not too small.
Max Temperature & Variance
Comparing to the original EasyPress, the EasyPress 2 has only +/- 5°F this makes it so much more reliable and easy to work with different types of materials.
It can also reach 400°F!
This opens a whole new range of materials. Like Printable Iron On and Sublimation.
USB Port
One of my favorite things about the EasyPress 2 is the Firmware!
This, you guys, it's HUGE!
Because if Cricut finds an error, or better ways to keep make your Machine more Efficient then you get to update it. Just like you with your Phone, and/or computer.
Heat Up Time
The EasyPress 2 is extremely FAST to heat up. I mean, I was truly impressed. The little one – 6 x 6 inches – can take about a minute. The Mid-size 9 x 9 inches will take around 2 minutes and the Jumbo Press – 12 x 10 inches – will take around 3 minutes.
Thicker Heat Plate
What allows the EasyPress 2 to reach a much higher temperature than the first model is the thicker plate. This plate is very well designed and is ceramic-coated.
Safety Base
The Safety Base is a Must, comparing it with the previews model it stands taller, this makes crafting fun and safe at all time.
Something really cool too is that if you haven't used your EasyPress in the last 10 minutes, it will automatically shut off.
User-Friendly
Many electronic devices come with a learning curve and a big manual of instructions for you to be able to use it.
The EasyPress 2 is SO intuitive, you will see that once you use it once, you will know how to use it for good!
Cricut Infusible Ink
With the Easypress 2, you can use Cricut Ifusible Ink! A line of products that requires a 400 °F for ideal transfer.
Read this guide to learn more about Infusible Ink.
EasyPress 2 vs Regular Iron
Ok!
This is about to get serious, and a little bit personal! The first time I did an Iron-On project I was ready to give up. I am not kidding, I looked at multiple videos, and it still took me good 15 minutes.
I understand It was my first time. But still, 15 minutes? I was trying to be cool to post it on my Instagram, and oh well, I just had to press and press, until it was finally decent.
I thought, com'on I don't really need that EasyPress, I can get the same results with just a regular Iron…
Did I forget to mention it was just a ONESIE??? Teeny, tiny design???
I can laugh at myself!
My second time with an Iron-ON project was right after Christmas. My Mother in Law had a great idea for all of us to get matching T-Shirts.
There were just 13 T-Shirts, and they took over 3 hours to get them ready… Yes 3 HOURS! Not only it felt like an eternity, but also the vinyl, on some of the T-Shirts got melted and ruined in some spots.
Again, we followed tips and instructions and at that moment I told my self that I was getting the EasyPress 2.
Crafting is about enjoying your time and the final result. Crafting is not a time to be frustrated and not having control of whether your project is going to work or not.
SO… At the first chance I got, I hit the buy NOW button and here I am writing this post after a really cool and amazing experience.
???
What is the problem of a REGULAR Iron?
A regular house Iron doesn't heat up evenly, and this causes that some parts of the design you want to transfer get under and overheated.
Most Irons have little holes in them for steaming your clothing and making it easy for you to Iron your Clothes. However, these little holes will be a NIGHTMARE for you to have a perfect transfer because you won't be getting as much heat and pressure to apply your vinyl on your T-Shirt.
Not only a regular Iron doesn't warm up evenly, but it – usually – doesn't let you heat up to your desired temperature. Yes, you can choose what kind of garment you are using, but that alone is not enough.
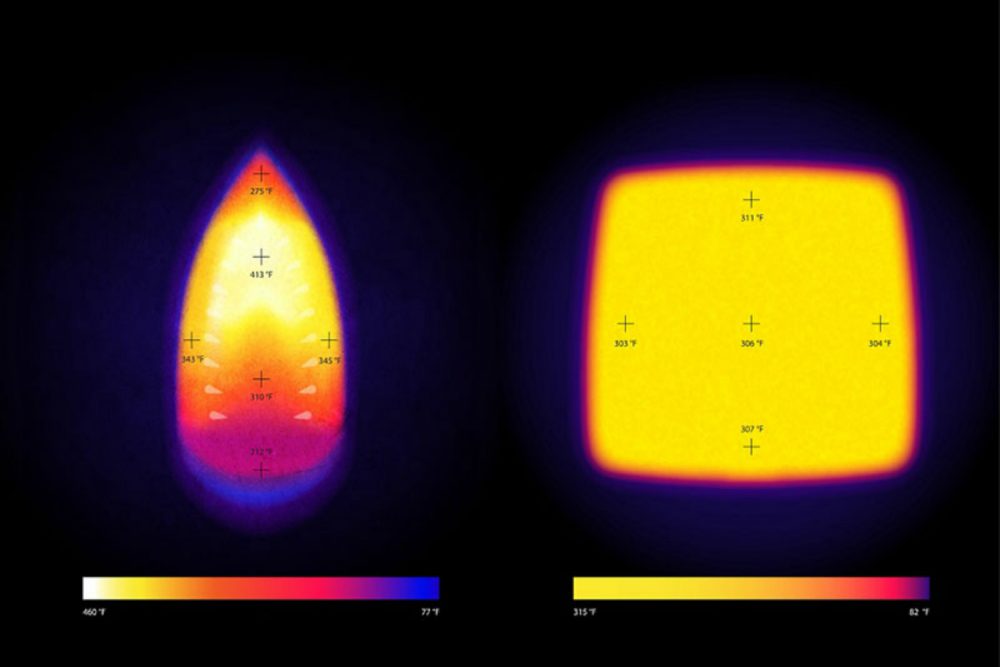
Here's the thing, there are multiple types of Iron-On or HTV you can transfer to different types of materials, and they all have different indications so every SINGLE time you use a regular iron you will be wondering whether your project will turn out good or not.
In other words, Regular Irons are designed to press your clothes to perfection, not vinyl. Sure, if you aren't planning on making tons of T-Shirts, a regular Iron will be just fine. However, if you want to personalize tons of T-Shirts, trust me. The EasyPress 2 is worth EVERY SINGLE PENNY!
EasyPress 2 vs Heat press
What is a Heat Press? A Heat Press is a machine that allows you to transfer a design on T-Shirt, Mug, Plates, etc. Heat Presses are quite big and are used in more business settings.
First of all…
I've never tried a Heat press in the past, however, I just spend a whole afternoon reading articles and watching tons of videos of people using them and comparing them with the EasyPress 2.
What can I say?
I really wanted to put together I great guide for you and I figured that you may benefit from what I learned in the process.
These are the conclusions I got as I researched to put together this post:
- Heat Presses are you go to if you are planning on having a T-Shirt Business. They have adapters that you can use to imprint designs on Mugs, T-shirts, Plates, etc.
- The EasyPress 2 does give professional results, but you are more limited to work with flat surfaces. Many Heat Presses have really cool adapters.
- EasyPress 2 takes less time to heat up completely. Compare 1-3 minutes for the Jumbo size to 7-18 minutes for a Heat Press.
- They have a more difficult learning curve and they are not as user-friendly as The EasyPress 2.
- Heat Presses are really big in size, and they can reach over 500°F. They are not easy to store and can be quite dangerous if you don't take proper precautions.
- The EasyPress 2 is very easy to store and travel with.
Conclusion: if you are planning on making a living and selling products in bulk, the Heat Press is the right fit for you. If you want to just craft without the hassle like me, then the EasyPress 2 is the best option for you.
Check out some of the videos I watched:
- Iron vs Cricut EasyPress vs Heat Press: Which One Should You Buy?
- Heat Press Versus EasyPress: Should you buy the Cricut EasyPress?
- Print Then Cut Vs Sublimation
What Materials Can I use the EasyPress 2 On?
There are many materials you can use with the EasyPress.
However, there's something very important that you need to keep in mind at all times; and that is the difference between Iron-On materials – What you want to transfer – and the base materials – where you want to transfer it.
These are some of the Iron-On and Base Materials Cricut has listed on its website.
If you end up buying the EasyPress 2 make sure to visit the preview link to see the different settings for all of the Iron-On and base material combinations.
They truly differ!
Sometimes you need to have higher temperatures, gentle or firm pressure. And there are occasions where an Iron-On material is not even recommended on a a base material.
You've been warned!
| Iron-On Material | Base Material |
| Everyday Iron-On | Burlap |
| Foil | Cardstock |
| Fusible fabric | Cotton |
| Glitter | Nylon |
| Holographic Sparkle | Faux Leather |
| Patterned Iron-On | Mesh |
| Iron-On Designs | Polyester |
| SportFlex Iron-On | Felt |
| …More! | … More! |
Unboxing the EasyPress 2
One more time…Cricut has done it!
The way they package their products are amazing and you can just feel the quality of everything they have!
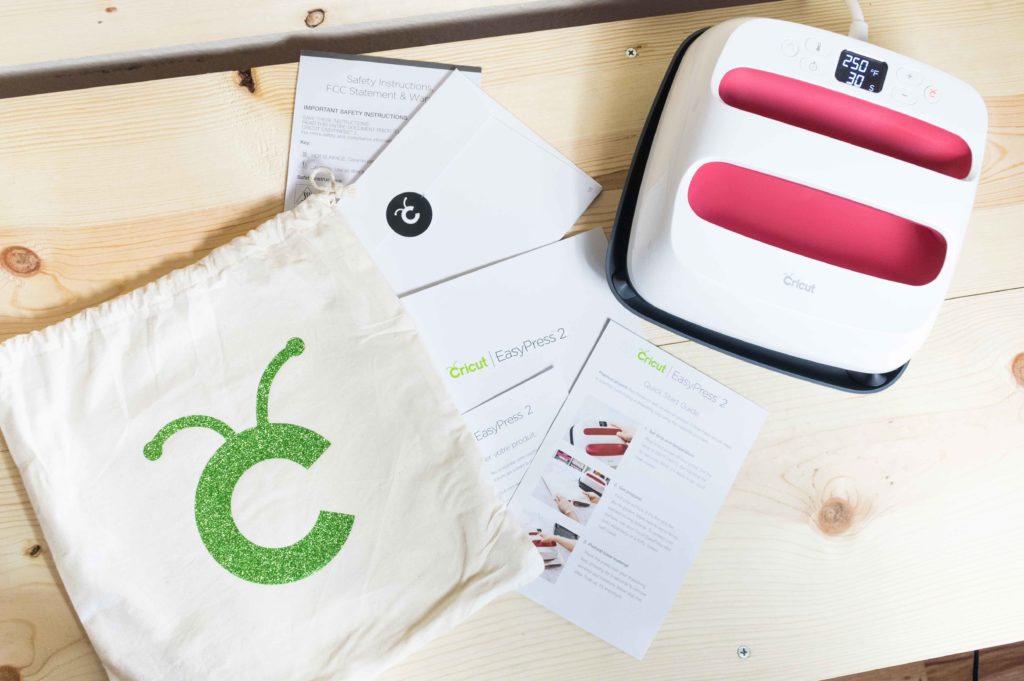
As you can see in the photo right above. These are all of the things that come inside the EasyPress box:
- EasyPress 2
- Safety Base
- Instructions /Safety warnings,
- Warranty Card – Register your machine 🙂
- Practice Project (Storage bag + Green Vinyl)
Did you know I have a YouTube channel? It's growing little by little!
On the video right down below you will be able to see the Unboxing process plus a step by step of the Practice Project you get!
I truly encourage you to watch it and see what to expect if you were going to buy the EasyPress 2!
First Project Tutorial
I want you to feel like you would if you got this machine, That's why I am including the First Project on this review!
Some of the things that I absolutely love about Cricut is how they send you with your first project for you to practice! ❤❤❤
It happened with my Explore Air 2, It happened with my Maker and it happened with my EasyPress.
When a company does this, you know they really want to set you up for success.
So check out what is this project is all about.
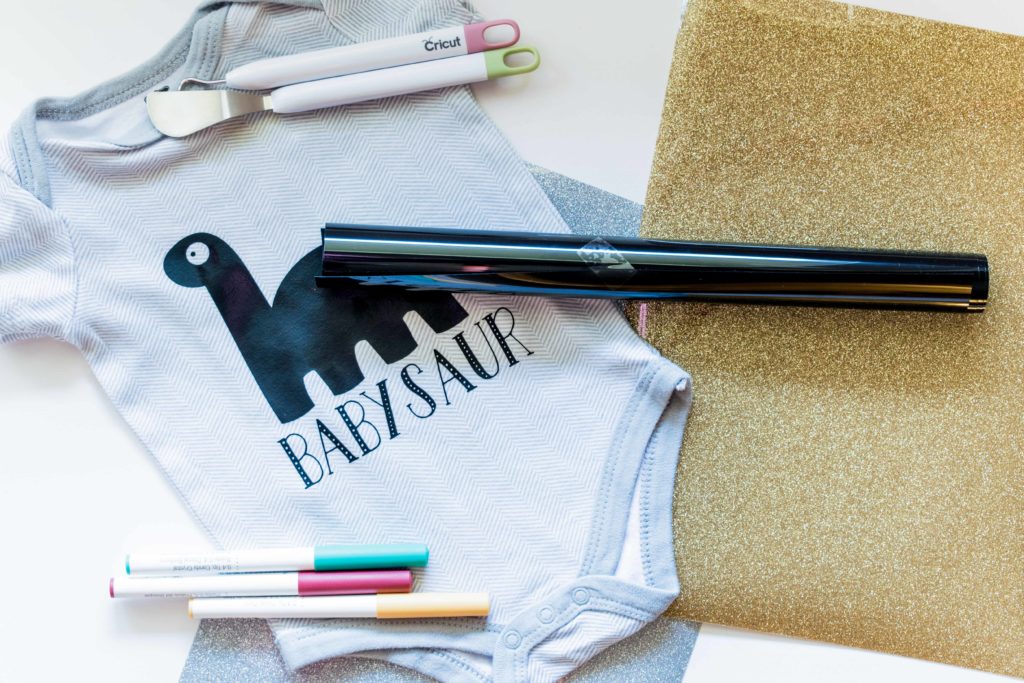
Materials Needed
The box comes with all you need for this first project:
- Glitter Vinyl
- Storage bag
- EasyPress 2
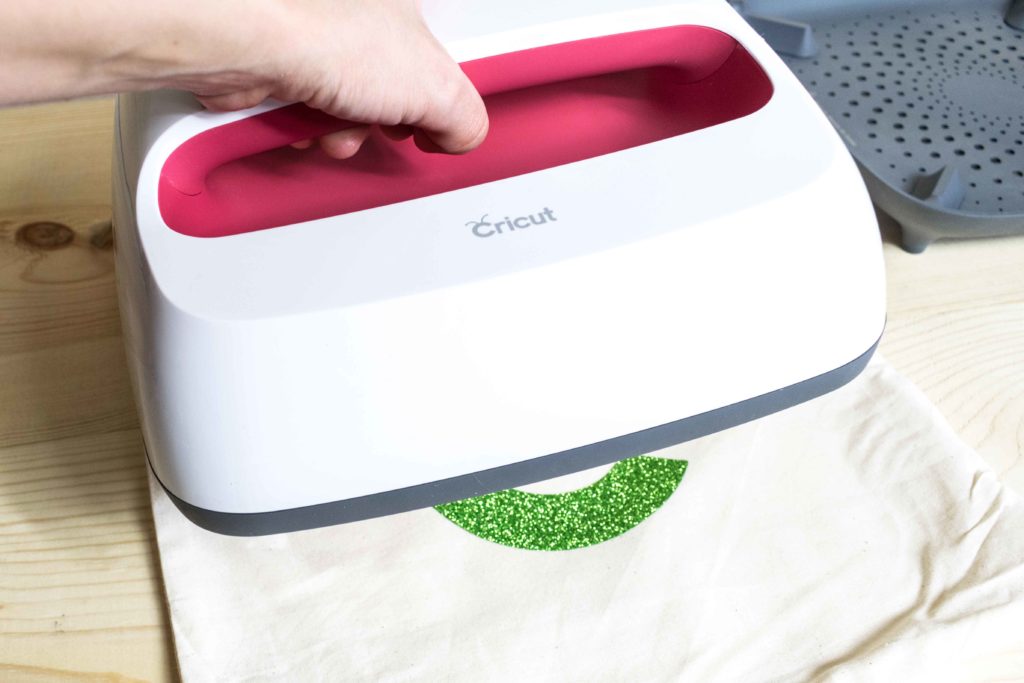
Step 1
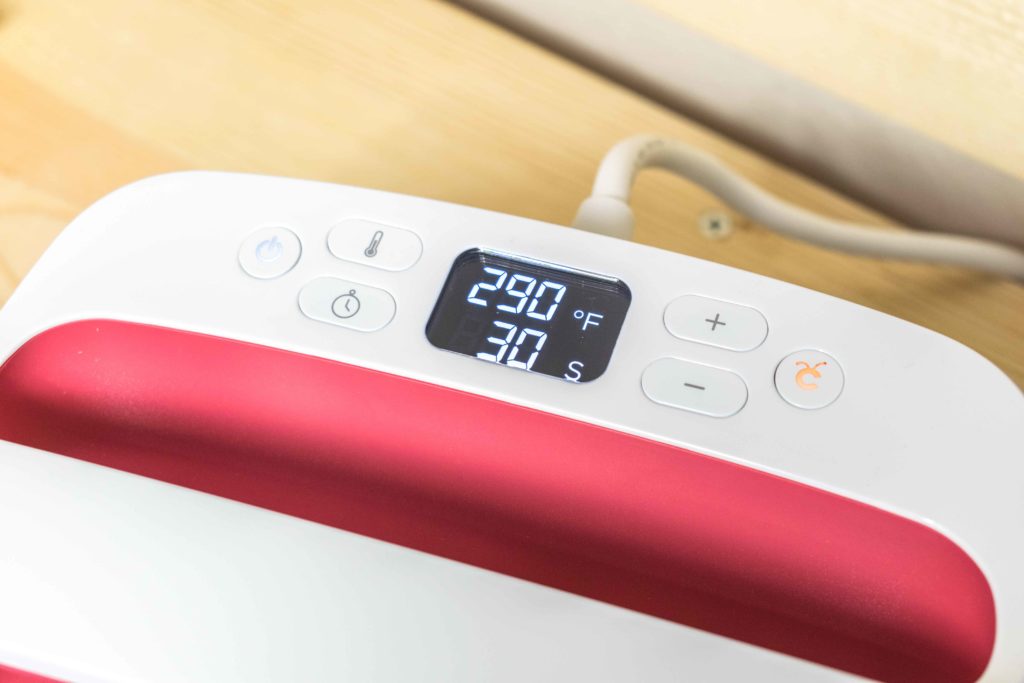
Connect your EasyPress 2 and set it to 290 F. You can do this by taping on the temperature button and then adjusting with the + or – signs.
If your timer is not set to 30 by default tap on the time button and then adjust it with the + or – signs.
Step 2
When your EasyPress reaches the ideal temperature it will beep, then make sure to press the storage bag for about 5 seconds.
You want to get rid of any wrinkles and have a smooth surface before you attempt to transfer your vinyl.

Step 3
Place your vinyl where you want it to be. Make sure that the shiny side is up! Then get the EasyPress 2 and apply gentle pressure on the Vinyl. Make sure to start the timer to by tapping on the Cricut button.
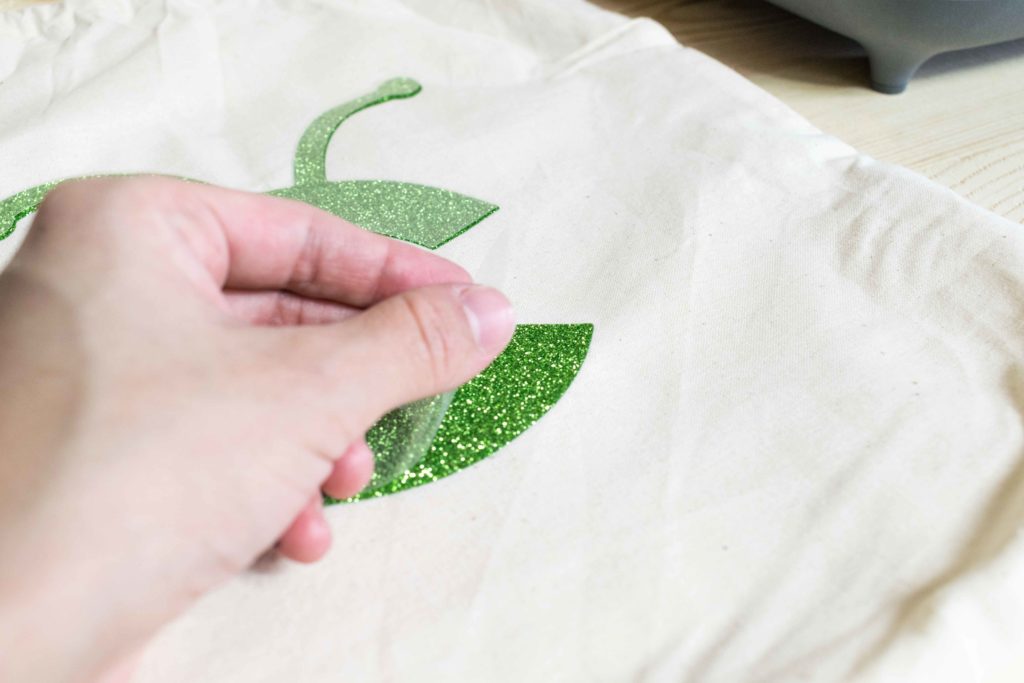
Step 4
Once done, flip the storage bag and press it again for about 15 seconds. Then flip again and wait till the design is warm to the touch and carefully peel it off.
Note: if for some reason the vinyl is not 100% pressed into the storage bag. Press one more time.
EasyPress 2 Final Thoughts – Pros & Cons
I think if your budget allows it and you plan on making T-Shirts very often, for you and your family, the EasyPress 2 is such a cool toy to have!
Pros
Being able to know your project will look beautiful at the end is priceless. A project requires time, Effie and money.
Time is always a trade-off, for me as a wife, mom, and blogger; 15 minutes to press a baby onesie is not a viable option at this time.
Crafting for me is a time to relax and not stress and just by using the regular Iron I felt with no control whatsoever.
Something that I also like about the EasyPress 2 and Cricut, in general, is their customer service and the ability for you to find tutorials, cut files, and more.
I love love love how easy it is to store, if you live in a tiny apartment like me, this is just amazing!
Some people say that if you are doing commercial projects, you should have a heat press instead. I totally disagree with this statement, the EasyPress 2 gives you professional results in less than a minute. (Get a heat press if you are planning on mass producing)
Last, but not least, when you buy something Cricut, you aren't just buying a machine. You are part of a community.
Cons
What about the EasyPress cons? Are there any?
As with anything in life you are going to find good and bad things. In my personal opinion, the biggest CON of this machine is its price.
If you are under a budget and you are not going to be working with Iron-On materials perhaps having an EasyPress 2 is not the wisest decision for you.
Also, and according to my research, if you are interested in making tons and tons of T-Shirts, the EasyPress isn't as good a some of the best heat presses out there.
Oh…
Oh!
And just so you know, I also have a library full of free SVG files and Printables for all my subscribers, a.k.a Daydreamers. You can see a preview right here or get access by filling out this form.
Source: https://www.daydreamintoreality.com/cricut-easypress2-review/
0 Response to "Cricut Easy Press 2 Reviews Everthing Bundle"
Post a Comment